

Chiles Rellenos Recipe (Step-by-Step Guide)
I make chiles rellenos for my kids on their birthdays now. It’s become our family’s celebration dish — the one everyone puts in a request for. My daughter calls them “the fancy ones,” which I love, because they’re not actually that complicated. They just require a few specific techniques done in the right order, and once you have those down, you’ll make them confidently for the rest of your life.
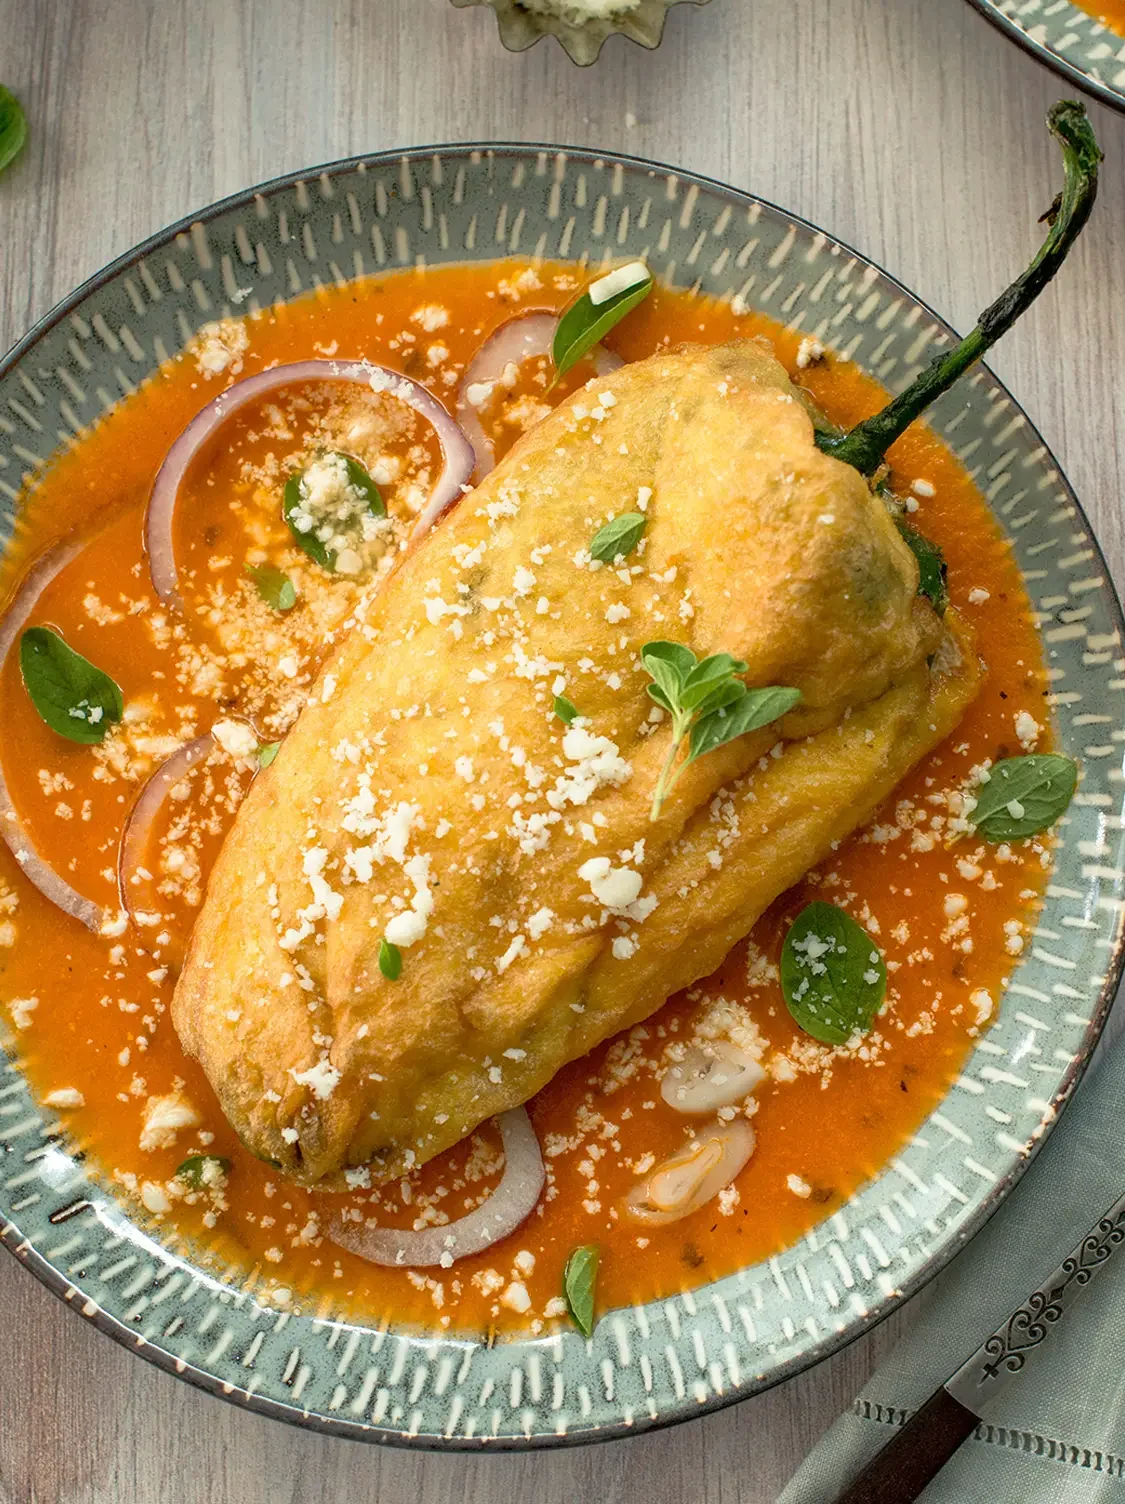
The dish itself is pure Puebla — a whole poblano chile, fire-roasted, peeled, stuffed with cheese (or a savory-sweet picadillo), coated in the lightest, airiest egg-white batter you’ve ever tasted, and pan-fried until golden. Then bathed in a simple, bright tomato-broth sauce. It is at once rustic and elegant, and it photographs extraordinarily well if that’s relevant to your life. Let’s make them.
Recipe at a Glance
• Prep time: 30 minutes
• Cook time: 30 minutes
• Total time: 1 hour
• Difficulty: Intermediate (the egg-white batter technique requires patience and attention)
• Yield: 4 servings (4 chiles rellenos)
• Course: Main / Vegetarian main
• Region/Origin: Puebla, Mexico; eaten nationwide
Ingredients
For the Chiles
• 4 large fresh poblano chiles — the larger and more uniformly shaped, the easier to stuff
On poblanos: This is the only chile for authentic chiles rellenos. Their thick, meaty walls hold up to roasting and frying, their flavor is deep and slightly smoky, and they’re just wide enough to stuff. Do not substitute bell peppers — the flavor is completely different, and the entire point of the dish is the poblano itself. Look for large, dark-green poblanos at any Latin grocery store or well-stocked supermarket.
For the Cheese Filling
• 8 oz (225 g) Oaxacan cheese (quesillo), pulled into thin strips or torn
• Or 8 oz (225 g) Chihuahua cheese, cubed — melts beautifully and is widely available in Texas
• Or 8 oz (225 g) Monterey Jack as a U.S. substitute — good melt, mild flavor
For the Picadillo Filling (Alternate/Traditional Puebla Style)
• ½ lb (225 g) ground pork or beef
• 2 roma tomatoes, diced
• ¼ white onion, finely diced
• 2 garlic cloves, minced
• 2 tablespoons raisins
• 2 tablespoons slivered almonds, lightly toasted
• ¼ teaspoon ground cinnamon
• ¼ teaspoon ground cumin
• 1 tablespoon neutral oil
• Salt to taste
On picadillo: The sweet-savory combination of raisins and almonds in the meat filling is classic Pueblan cooking — a legacy of the convents where Spanish nuns created the elaborate cuisine that defines the state. It sounds unusual if you’ve never tried it; it tastes remarkable.
For the Egg Batter (Capeado)
• 4 large eggs, separated
• Pinch of fine sea salt
• ¼ cup (30 g) all-purpose flour, for dusting
The batter is the technique. Stiff-beaten egg whites folded gently into yolks create a coating that puffs like a cloud and turns golden and delicate in the oil. This is what separates an authentic chile relleno from a stuffed pepper. Don’t rush this step.
For Frying
• 1–1.5 cups (240–360 ml) neutral vegetable oil, for a shallow fry
• Traditional alternative: lard — gives a subtly richer, more flavorful result
For the Tomato Broth Sauce (Caldillo)
• 3 roma tomatoes
• ¼ white onion
• 2 garlic cloves
• 1 cup (240 ml) chicken broth (or vegetable broth)
• 1 tablespoon neutral oil
• ½ teaspoon dried Mexican oregano
• Salt and pepper to taste
For Finishing
• Mexican crema (or sour cream thinned with a little milk)
• Queso fresco, crumbled
• Fresh cilantro leaves
We offer catering services in and around Austin, TX and Texas Hill Country. Inquire HERE.


Step-by-Step Instructions
1. Char the Poblanos. Place the poblano chiles directly over a medium-high gas flame, using tongs to turn them every minute or so. You want the skin to blister and blacken on all sides — the kitchen will fill with the sweet, smoky scent of roasting chile, and you’ll hear the skin crackle and pop as it blisters. This is not optional, and it’s not possible to over-roast a poblano for this purpose. If you don’t have a gas stove, position the poblanos as close to a broiler element as possible and char them under high broil, turning every 3–4 minutes.
2. Steam and Peel. Transfer the charred chiles immediately to a zip-lock bag or a bowl covered tightly with plastic wrap. Let them steam for 15 minutes — this loosens the skin dramatically. After steaming, peel the skins off under cool running water, or dry-peel if you prefer to preserve the concentrated roasted flavor (the water method is easier; the dry method is slightly more flavorful). Work gently and don’t rush.
3. Make the Slit and Remove Seeds. Using a small paring knife, make one clean lengthwise slit down each chile — from just below the stem to the tip. Carefully open the slit and use a small spoon to scrape out the seed cluster and white veins, leaving the stem intact. The chile should now be a hollow vessel. Rinse gently under cold water if needed.
4. Make the Filling.For cheese filling: Simply stuff the chile with the torn or cubed cheese, pressing it gently into the cavity. The cheese should fill the chile without overstuffing — you need to be able to close the slit. For picadillo: Heat oil in a skillet over medium-high. Add onion and garlic; cook 2 minutes. Add ground meat, breaking it up, and cook until browned. Add tomatoes, raisins, almonds, cinnamon, and cumin. Season with salt. Cook 8–10 minutes until the mixture is fragrant and most of the liquid has evaporated. Let cool slightly before stuffing.
5. Close and Flour the Chiles. After stuffing, press the slit edges together as closely as possible and secure with a toothpick if needed (remove before serving). Dust the outside of each stuffed chile lightly with flour, shaking off any excess. This flour layer gives the egg batter something to grip.
6. Make the Egg Batter. Separate the eggs carefully — any yolk in the whites will prevent them from beating properly. Beat the whites with a pinch of salt in a very clean, dry bowl using a hand mixer or stand mixer. Beat to stiff peaks — when you lift the beaters, the peaks should stand straight up without drooping. In a separate small bowl, lightly beat the yolks. Fold the yolks gently into the beaten whites using a spatula, cutting through the center and folding in broad strokes. Stop the moment just combined — you want a thick, airy, pale-yellow batter.
7. Heat the Oil. Pour oil to a depth of about ¾ inch (2 cm) in a heavy skillet (cast iron is ideal). Heat to 350°F (175°C) — test with a small drop of batter; it should sizzle immediately and rise to the surface without immediately burning.
8. Dip and Fry. Working with one chile at a time, hold the stuffed chile by the stem and submerge it in the egg batter, turning to coat all sides completely. Lower it gently into the hot oil, stem-end first. Fry for 3–4 minutes per side, until golden brown. Don’t crowd the pan — fry two at a time maximum. Drain on paper towels. > Oil temperature is everything here. Too cool, and the batter absorbs oil and becomes heavy and greasy. Too hot, and the exterior burns before the cheese inside melts. Keep a thermometer in the oil or do a batter-drop test before each batch.
9. Make the Caldillo Sauce. Char the tomatoes, onion, and garlic in a dry cast-iron or comal until blistered and slightly blackened on the outside — 3–4 minutes per side. Transfer to a blender; add broth. Pulse until rough and chunky (not fully smooth). Heat oil in a saucepan over medium-high; pour in the blended sauce and fry for 4–5 minutes, stirring, until slightly thickened and darkened. Season with oregano, salt, and pepper.
10. Serve. Ladle the warm caldillo into shallow bowls or plates. Place the fried chiles rellenos on top of the sauce — not submerged, just resting. Drizzle with crema, crumble queso fresco over the top, and add a few cilantro leaves.
Tips, Variations & Substitutions
Texas Sourcing
Large, dark-green poblano chiles are available at virtually every H-E-B in Texas, often in the produce section near the specialty peppers. Oaxacan cheese (quesillo) can be found at H-E-B in the specialty cheese section, and Chihuahua cheese — which melts beautifully — is stocked at most H-E-B and Walmart locations in Texas. For the best selection of fresh poblanos at their peak, Central Market in Austin or any Latin grocery in San Antonio is hard to beat.
Regional Variations
• Chiles en Nogada (Puebla seasonal): The most elaborate variation — stuffed with a complex picadillo of meats, fruits, and spices, then topped with a white walnut cream sauce and garnished with pomegranate seeds and parsley in the colors of the Mexican flag. Made only in late summer when pomegranates and walnuts align. Worth attempting once in your life.
• Norteño style: Typically cheese-only filling; simpler, thinner caldillo; sometimes served without sauce at all.
• Oaxacan style: Sometimes stuffed with black beans and cheese; served with a black bean sauce instead of tomato.
• No-batter variation: In some home kitchens, the chiles are stuffed and served without the egg batter (capear) — simpler, lighter, and still wonderful. The caldillo takes on even more importance without the batter.
Spice Adjustments
Poblanos are naturally mild (1,000–2,000 Scoville units), and roasting reduces their heat further. For a spicier dish, add a diced serrano to the caldillo. For a very mild version, soak the seeded chiles in cold salted water for 20 minutes before stuffing to further reduce any residual heat.
Baked Version
Skip the egg batter and the frying. Stuff the roasted, peeled chiles, place them in a greased baking dish, brush lightly with oil, and bake at 425°F (220°C) for 15 minutes until heated through. The result won’t have the cloud-light golden coating of the fried version, but the chile and filling flavors shine clearly and the dish is significantly less labor-intensive.
Gluten-Free
Substitute the all-purpose flour with rice flour or potato starch for dusting. The egg batter itself is naturally gluten-free.
Serving Suggestions
The classic plate in Mexico: two chiles rellenos in caldillo, flanked by arroz rojo (Mexican red rice) and a scoop of refried beans. Warm corn or flour tortillas alongside. To drink, a cold agua de tamarindo (tamarind water) or a light Mexican beer complements the richness of the fried batter and the tomato sauce beautifully. A drizzle of crema and a crumble of queso fresco finish the plate.
For presentation: ladle the caldillo into a shallow pasta bowl first, then nestle the chile on top so the batter doesn’t soften in the sauce. The batter should be crisp on the bottom, slightly sauce-soaked on the sides. Add the crema drizzle at the last possible moment.
The color contrast of golden batter against bright red sauce, with a white crema stripe and green cilantro, makes this one of the most visually compelling plates in Mexican home cooking. It’s very good for dinner parties where you want to impress without spending the whole evening in the kitchen.
Cultural & Historical Notes
The marriage of chiles and cheese in Mexican cooking predates the Spanish arrival — according to culinary historians, indigenous Mexicans were stuffing chiles with various fillings long before European contact. But the battered and fried version — the one we know today — developed in the colonial convents of Puebla, where Spanish nuns introduced egg-frying techniques to the Mexican kitchen and blended them with indigenous ingredients.
Puebla is widely considered one of Mexico’s most culinarily significant states — the birthplace of mole poblano, chiles en nogada, and several other dishes that are now considered national icons. The city’s convent cuisine tradition, in which Spanish nuns created elaborate dishes that combined European and indigenous ingredients, had an outsized influence on what we think of as “Mexican food” today.
The most famous variation of chiles rellenos — Chiles en Nogada — is traditionally believed to have been created by Augustinian nuns in Puebla in August 1821 to celebrate Mexican Independence and honor Agustín de Iturbide. The dish’s three colors — the green of the parsley, the white of the walnut cream, and the red of the pomegranate — deliberately mirror the colors of the Mexican flag, making it one of the most patriotically significant dishes in the national canon.
Frequently Asked Questions
What kind of cheese is best for chiles rellenos? Oaxacan cheese (quesillo) is traditional — it melts into long, stringy ribbons and has a mild, slightly tangy flavor that pairs beautifully with the roasted poblano. Chihuahua cheese is widely available in Texas and melts even better. Monterey Jack is the most widely available U.S. substitute and works well. Avoid cheddar (too sharp and greasy when melted) and mozzarella (too wet; will steam the batter from inside).
Can I make chiles rellenos ahead of time? You can roast, peel, and stuff the chiles up to a day ahead and refrigerate them. Make the caldillo ahead as well — it improves with time. However, batter and fry them immediately before serving; fried egg batter does not hold well and becomes soft quickly. If you’re feeding a crowd, set up a frying station and fry to order — it’s faster than it sounds.
Why does my batter fall off during frying? Three common causes: (1) The chile was too wet when you floured it — pat it dry thoroughly before dusting. (2) The whites weren’t beaten to true stiff peaks — the batter needs structure to adhere. (3) The oil wasn’t hot enough — cold oil causes the batter to slide off before it sets. Use a thermometer and don’t skip the preheat.
Can I bake instead of fry? Yes, though you’ll lose the cloud-light battered crust. See the baked variation in the Tips section above. It’s a good option for weeknight cooking or when you want the dish without the frying logistics.
What’s the difference between chiles rellenos and Chiles en Nogada? Both start with a stuffed, fire-roasted poblano chile. Chiles en Nogada uses a more complex picadillo filling (including fruits and multiple spices), is not battered or fried, is topped with a cold walnut cream sauce (nogada) and garnished with pomegranate seeds and fresh parsley. It is a seasonal dish made only in July–September when fresh walnuts and pomegranates are available, and it is one of the most labor-intensive preparations in all of Mexican cuisine.
How do I keep my chiles from falling apart when I peel them? Steam them adequately — 15 minutes minimum in a covered bowl or bag after charring. Rushing this step makes peeling difficult and tears the flesh. Peel in the direction of the chile’s length (top to bottom), not across the grain. Work slowly near the stem, which is the most fragile area.